Outlook Overview and How to Use the Online Version
Need to access your email on a device where Outlook is not installed? You access Outlook on the web.
- Watch this video to learn how to log into Outlook Web Access (OWA). Or you can follow these steps:
-
Go to outlook.office.com. That should forward you to a GoDaddy sign in page.
-
Sign in using your email and password.
Once you’re inside the online email platform, you should have access to all of the same features you have on the desktop version.
Outlook Signatures, Calendar, Vacations, and Booking Meeting Rooms
- How to add calendars other than your own to Outlook: Video Tutorial
- Go to file > open > shared calendar.
- To see public vacations calendar, search for it, highlight it and click open.
- To see or add a person’s calendar, follow the same steps, search for their name, click open.
- How to book meeting rooms and/or create calendar events: Video tutorial
- When you’re inside Outlook, click the calendar icon to go to the calendar view.
- Click new event.
- Give it a title, add other attendees, choose a location, choose a time, and give it a description before sending the invitation.
- To see a bird’s eye view of availability for all involved in your event, click the scheduling assistant. The scheduling assistant will visually show you where there’s an overlapping break in all calendars.
- Go ahead and click “send invitation” to invite all attendees. That will send them an email inviting to to attend. From there, they’ll have the opportunity to RSVP attending, tentative, or decline.
- How to add or edit a signature in Outlook: Video Tutorial
- Open Outlook.
- Click new message.
- Click signature button.
- Click manage signatures.
- From there you can use the plus or minus signs to add a new signature.
- Give it a title, then edit the contents and save it.
- You can choose from the options to use a signature for different purposes including new emails, replies, etc.
- Click save to save your newly created signature.
# Out of Office Reply Setup
- Setting up automatic replies when you’re out of office
1. At the bottom left corner of the of the navigation pane, click Mail.
2. On the Tools tab, click Out of Office.
- In the Autoreply Settings box select the account on the left you want to setup the out of office reply, check the Send automatic replies for account “X” box (where “X” is the account you’d like to send out of office replies from).
- Under Reply once to each sender with, enter your automatic reply.
- To set the start and end dates, select the Only send replies during this time period check box, and enter the start and end dates and times.
- Note: When you check this box and set start and end dates and times, your out of office replies will turn off automatically when the end date and time occurs.
- To set options for replying to people outside your organization (if it is enabled by your Exchange administrator), check the Also send replies to senders outside my organization box, select Send to all external senders, and under Reply once to each external sender with, enter your automatic reply.
- Click OK.
What to do With Spam and Phishing Emails
- Here’s is what you do when you encounter suspicious emails: Click Here for How-to Video
1) Reach out to me and I can help determine if the email has nefarious intent.
2) For spam (emails that are looking to scam anyone), please “forward as attachment” to spam@mimecast.org
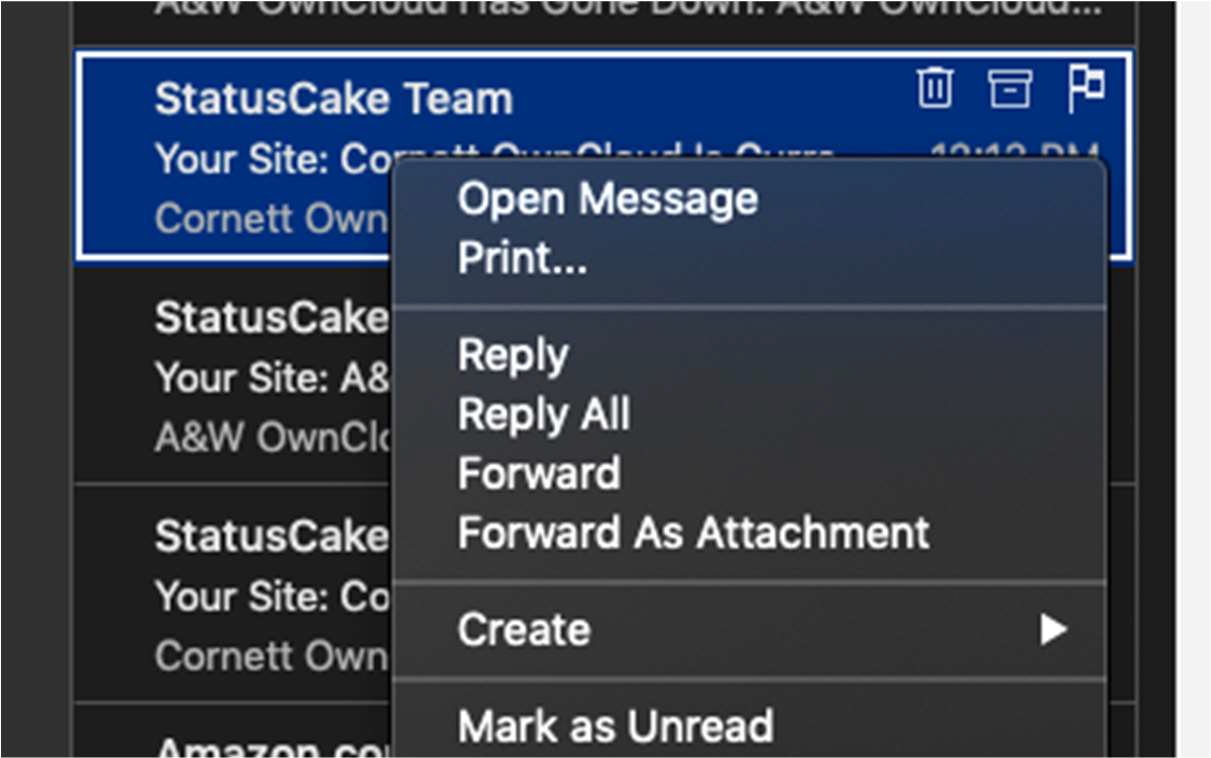
3) For phishing scams (targeted emails, much like the ones that mention Kip and pose as a legit person or organization), please “forward as attachment” to phishing@mimecast.org. You can do this by right (or secondary) clicking on the email and clicking on “forward as attachment.”
See screenshot below:
What is Mimecast? And Hpw to Use it
Mimecast is our email security provider. You can check to see your blocked emails and release them if they are legitimate by logging into the Mimecast portal.
- To log in:
- Navigate to the following URL: https://login.mimecast.com
- Enter your Email Address (username@teamcornett.com) in the logon screen.
- Click on the Next button.
- In the Password field, enter the password that has been provided by your Administrator.
- Select Cloud from the dropdown:
- Select Login.
How to check your held Emails
How to Forward as an Attatchment
Click Here to start Training Material